Elevation profiles are best generated using a geographic information system such as QGIS. To achieve acceptable speed and responsiveness, this software requires a computer fitted with a good graphics card, and also a fast internet connection as imagery is generated on the fly and not stored locally.
To create an elevation profile using QGIS one must first install two plugins:
- QuickMapServices (to load the required underlying OpenStreetMap base map)
- NASA SRTM (to load the elevation data).
Installing the OpenStreetMap Base Map
- Launch QGIS.
- From the “Project” tab on the menu bar, select “New” to create a new project.
- From the “Project” tab on the menu bar, select “Save” to save the project.
- Select “Plugins” from the QGIS menu bar.
- Select “Manage and Install Plugins”.
- From the search bar of the Plugins window, type and search “QuickMapServices”.
- Select “Upgrade” to download a new version of the plugin, where applicable.
- Click “Install” to install the “QuickMapServices” plugin.
- From pool of tools on the menu bar, select “Web”.
- Toggle to “QuickMapServices” and select OSM to import the OpenStreetMap base map.
Installing the NASA SRTM Downloader
- Select Plugins from the menu bar.
- Select Manage and install plugins.
- From the search bar of the Plugins window, type and search SRTM-downloader.
- Select Upgrade to download a new version of the plugin, where applicable.
- Click install to install the SRTM downloader plugin.
- From the QGIS menu bar, select Plugin.
- Select SRTM-downloader.
- Toggle to your location of interest.
- From the SRTM-downloader window, click “Set canvas extent”.
- Set “Output-Path” to your desired location folder where the SRTM is to be saved.
- Click “Download”.
- A window appears requesting for your Earthdata login. You will need to register for the NASA Earthdata portal’s Earthdata Login User Registration
- Key in the generated login details from Earthdata’s portal into QGIS login window.
- Click OK to download the elevation data.
Accessing the Elevation Profile View
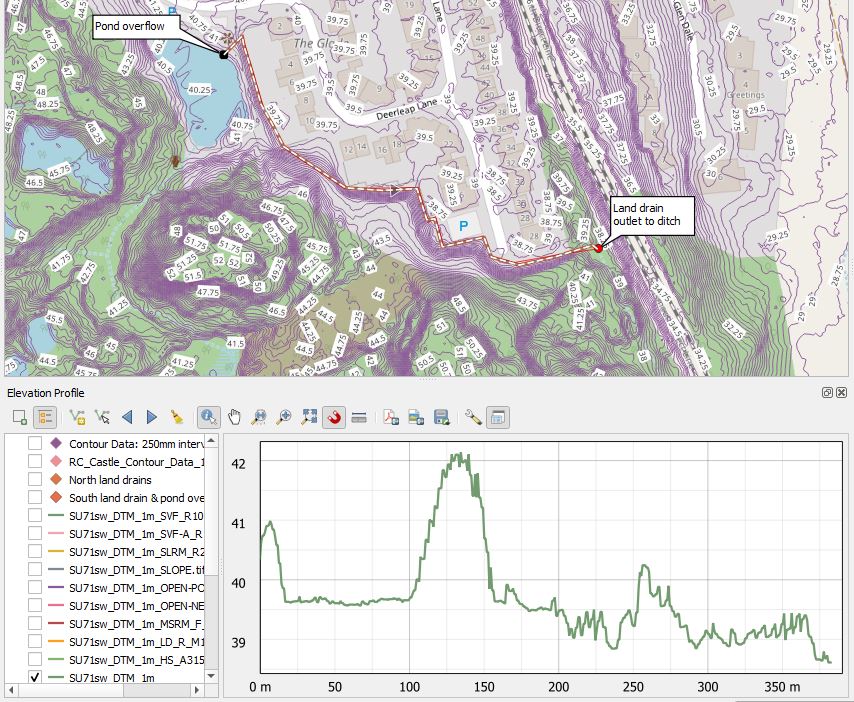
The elevation profile feature of QGIS may be accessed by going to “View” followed by “Elevation Profile”. Full instructions for using the feature may be found in the QGIS documentation.
The elevation profile can be analyzed directly within QGIS. You can hover over the graph to see specific elevation values at different points in the map view. The graph will display a tooltip with X and Y values with a corresponding black rounded square in the map view showing the location.
If needed, you can export the profile as a pdf or image file for further analysis or reporting. Cross-section profiles for all types of surface data, not just elevation, can be analyzed.